
A dripping pipe under your kitchen sink can waste water, damage cabinets, and encourage mold before you notice the full extent of the problem. You can prevent many expensive repairs with a few focused tasks, such as clearing gutters, sealing drafts, changing filters, and repairing minor surface damage. These quick fixes improve comfort, safety, and efficiency, but some warning signs mean you shouldn’t handle the work alone.
Key Takeaways
- Fix dripping faucets, leaking pipes, and loose toilet seals promptly to prevent costly water damage and mold.
- Clear gutters and extend downspouts away from the foundation to reduce flooding, erosion, and basement moisture.
- Seal drafts around doors, windows, outlets, and attic hatches to improve comfort and reduce energy waste.
- Replace clogged HVAC filters and test smoke and carbon monoxide alarms monthly for healthier, safer indoor spaces.
- Patch wall damage, refresh caulk, secure loose flooring, and replace cracked tiles to maintain your home’s appearance and condition.
Stop Small Plumbing Leaks
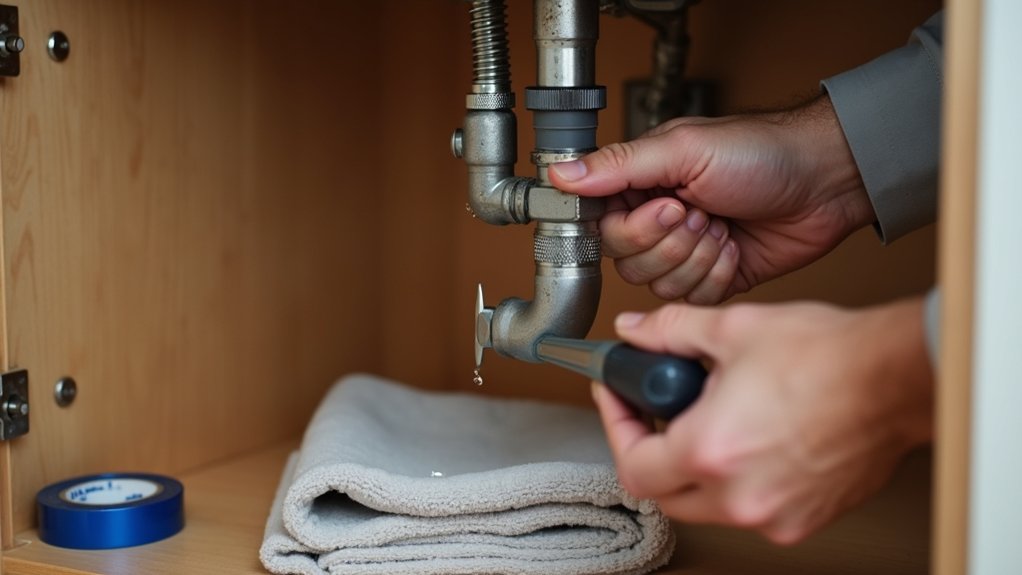
Small plumbing leaks can quickly damage cabinets, floors, and walls, so fix them as soon as you notice them. Check beneath sinks, around toilet bases, behind appliances, and near exposed pipes for dampness, stains, dripping sounds, or musty odors.
During leak detection, dry the area first, then place a towel underneath to confirm where water appears. Tighten loose connections gently with a wrench, but don’t overtighten plastic fittings. Replace worn washers, supply lines, or accessible seals, and use plumber’s tape on compatible threaded joints.
Shut off the local valve before repairs, or close the main supply if necessary. Include these checks in your plumbing maintenance routine, especially after cold weather.
If water continues flowing, damage is hidden, or pressure seems abnormal, call a licensed plumber promptly.
Clear Gutters and Downspouts
Clear leaves and debris from your gutters and downspouts to keep water flowing freely.
Check for blockages that could cause backups or overflow.
Make sure water drains away from your home’s foundation.
Remove Leaves and Debris
Before seasonal rain arrives, remove leaves and debris from your gutters and downspouts to keep water flowing away from your home. Put on gloves, use a stable ladder, and scoop out fallen leaves, twigs, pine needles, and roof grit by hand or with a small gutter scoop.
Place the material in a bucket rather than dropping it onto walkways or planted areas. This simple task supports effective garden cleanup and keeps yard maintenance from becoming a larger repair project.
Work in short sections, and move the ladder frequently instead of leaning or overreaching. After clearing each section, wipe away residue around the gutter edges and fasteners.
Schedule this maintenance in late autumn and again after severe weather, especially if trees overhang your roof. If the ladder feels unsafe, hire a qualified professional.
Check for Blockages
Once you’ve removed visible debris, check the gutters and downspouts for hidden blockages that could restrict water flow. Run a hose through each section and watch for slow movement, pooling, or water escaping at seams.
Use a plumber’s snake or a flexible gutter-cleaning tool to loosen compacted leaves, roof grit, and nesting material. If a downspout remains blocked, disconnect it carefully and flush both sections separately.
Don’t use your hands to reach into tight openings, and avoid harsh chemicals that can damage joints or contaminate runoff. Inspect outlet screens and elbows, where drain blockages commonly form.
Although ventilation systems don’t affect gutter flow directly, keep their exterior openings clear while you work nearby. Wear gloves, secure your ladder, and call a professional if blockage persists or repairs appear necessary.
Ensure Proper Drainage
To guarantee proper drainage, inspect your gutters and downspouts for standing water, sagging sections, or loose connections. Clear leaves, twigs, and sediment from gutters at least twice yearly, and check them after severe storms. Flush each section with a hose to confirm unobstructed flow.
Secure loose fasteners, seal small leaks, and replace damaged sections promptly.
Extend downspouts at least four to six feet from your foundation using elbows or splash blocks. Make sure discharge points slope away from the house and don’t erode nearby soil.
Review your garden grading so water moves away from walls, basement windows, and paved surfaces. If runoff still collects, improve landscape drainage with a dry creek bed, catch basin, or perforated drainpipe.
These quick fixes protect your foundation, reduce moisture problems, and help prevent costly repairs.
Know When to Call a Professional
Some home repairs require more than basic tools and DIY experience. Know your limits before a small defect becomes a costly hazard. Call a licensed professional when you encounter damaged wiring, gas odors, major leaks, structural cracks, or persistent plumbing problems. These issues can cause injuries or extensive property damage when handled incorrectly.
Schedule a Professional inspection if you notice recurring moisture, unusual noises, sagging ceilings, or unexplained increases in utility bills. An expert can identify hidden problems and recommend safe, lasting solutions.
Don’t delay Emergency repairs involving flooding, electrical sparks, sewage backups, or suspected gas leaks. Shut off utilities only when you can do so safely, leave the area if necessary, and contact the appropriate service.
Keep records of repairs and follow recommended maintenance to protect your home’s condition.
Seal Drafts Around Doors and Windows
Inspect window frames, door jambs, thresholds, and other common draft sources for visible gaps or moving air.
Apply weatherstripping around movable parts, and use caulk to seal fixed cracks.
You’ll improve comfort and reduce energy loss with a careful, targeted repair.
Inspect Common Draft Sources
Cold air often slips in through small gaps around door and window frames, making your heating or cooling system work harder. Start your draft inspection on a windy day. Move your hand along frame edges, corners, thresholds, and joints, or hold a tissue nearby to reveal moving air.
Check for daylight, cracked caulk, loose trim, and gaps where frames meet the wall. Don’t overlook attic hatches, baseboards, electrical outlets on exterior walls, and plumbing penetrations beneath sinks.
Examine the area around each opening from inside and outside, because damage or settling may create hidden pathways. Mark every problem before making repairs.
This careful survey supports effective draft prevention and identifies opportunities for insulation improvement. If you find dampness, rot, or significant movement, arrange a professional assessment before sealing anything.
Apply Effective Weatherstripping
Once you’ve identified the draft sources, choose weatherstripping that matches each door or window’s material, gap size, and frequency of use. Foam tape works well for small, irregular gaps, while rubber or silicone seals offer greater durability around frequently used doors.
For sliding windows, use flexible pile weatherstripping without restricting movement. Clean and dry every surface before installation, then measure carefully and cut each strip to fit. Press adhesive-backed products firmly into place, or secure screw-on options according to the manufacturer’s directions.
Check that doors and windows close smoothly without excessive pressure. Replace compressed, cracked, or loose material as needed. Effective window sealing reduces energy loss, complements insulation upgrades, and improves comfort.
After installation, inspect the edges on a windy day and correct any remaining leaks promptly.
Change Filters to Improve Airflow
How often should you change your HVAC filter? Check it monthly, especially during heavy heating or cooling seasons, and replace it when it looks dusty or clogged. Most homes need a new filter every one to three months, while households with pets, allergies, or renovations may need more frequent changes.
Start with proper air filter selection. Choose the size specified by your system, then review the filter’s MERV rating. A higher rating can capture smaller particles, but an overly restrictive filter may reduce airflow and strain your equipment. When in doubt, follow your manufacturer’s recommendation.
Turn off the system before replacing the filter, and install it with the airflow arrow pointing toward the furnace or air handler.
Clean filters help ventilation systems circulate air efficiently, improve comfort, and support healthier indoor air while reducing unnecessary energy use.
Refresh Chipped Paint and Scuffed Walls
Before touching up chipped paint or scuffed walls, clean the area and let it dry completely. Scrape away loose paint, then lightly sand the edges until they feel smooth.
Fill small dents or nail holes with spackle, allow it to cure, and sand it flush. For larger wall repairs, use a compatible patching compound and reinforce deeper damage as needed.
Remove dust with a clean, dry cloth before applying primer. Primer prevents patched areas from showing through and helps the finish coat adhere evenly.
Match the existing paint by checking its color, sheen, and brand whenever possible.
Apply a thin Paint touch up coat with a small brush or mini roller, feathering the edges into surrounding paint. Let it dry, assess coverage, and add another light coat if necessary.
Replace Hardware and Recaulk Wet Areas
With walls looking fresh, turn your attention to worn hardware and failing caulk in kitchens, bathrooms, and laundry areas. Replace loose cabinet pulls, tarnished knobs, and corroded towel bars to improve function and appearance. Choose Decorative hardware that matches your room’s finish and install it securely with the correct screws.
Before bathroom caulking, remove every trace of old sealant, soap residue, and mildew. Dry the joint completely, then apply a mold-resistant, waterproof caulk in a steady bead around tubs, showers, sinks, and countertops. Smooth it with a damp tool or gloved finger, and follow the manufacturer’s curing time before exposing it to water.
Check other wet areas for cracked seams, too. These small updates help prevent moisture damage, tighten daily-use fixtures, and give your home a cleaner, better-maintained finish.
Repair Loose Tiles and Damaged Flooring
Repair loose tiles and damaged flooring before minor problems spread into larger, costlier repairs. A hollow sound, movement, or cracked grout often signals trouble beneath a tile. For effective Tile repair, remove the damaged piece carefully, clean the surface, apply suitable adhesive, and reset a matching replacement. Regrout after the adhesive cures, then seal the joints in moisture-prone areas.
Inspect wood, laminate, and vinyl flooring for lifted edges, scratches, soft spots, or water damage. Secure loose boards, replace severely damaged sections, and address leaks promptly to prevent deterioration. Don’t ignore uneven transitions or exposed fasteners, which can create trip hazards.
Include regular Flooring maintenance in your routine by sweeping grit, wiping spills quickly, using protective pads, and following the manufacturer’s cleaning recommendations. If subfloor damage extends widely, hire a qualified flooring professional.
Test Smoke and Carbon Monoxide Alarms
Test smoke and carbon monoxide alarms at least once a month to confirm they’ll warn you during an emergency. Press each test button and listen for a loud, clear signal. If an alarm sounds weak, stays silent, or chirps repeatedly, replace its batteries immediately. Never ignore persistent chirping; it may indicate a low battery, malfunction, or expired unit.
For reliable home safety, keep alarms on every level, inside bedrooms, and outside sleeping areas. Vacuum dust from vents carefully, and don’t paint over any device. Replace smoke alarms every 10 years and carbon monoxide alarms according to the manufacturer’s instructions, typically every five to seven years. Record replacement dates to simplify alarm maintenance.
If you rent, report faulty alarms to your landlord promptly. During testing, ensure everyone recognizes each alarm’s sound and knows two escape routes.
Frequently Asked Questions
How Often Should You Inspect Your Roof for Missing Shingles or Storm Damage?
You should schedule a Roof inspection twice yearly—spring and fall—and check after severe weather. Look for missing shingles, leaks, dents, or debris. Address Storm damage promptly to prevent moisture intrusion and costly repairs.
What Simple Steps Can Improve Your Home’s Energy Efficiency Beyond Sealing Drafts?
Upgrade insulation, optimize lighting, and manage sunlight to improve your home’s energy efficiency beyond sealing drafts. Prioritize insulation upgrades, install Window treatments, replace inefficient bulbs, service HVAC equipment, and choose programmable thermostat settings.
How Can You Prevent Pests From Entering Your Home Through Foundation Cracks?
Prevent pests by inspecting your foundation regularly, sealing gaps with durable masonry sealant, and maintaining Foundation sealing around utility penetrations. Use crack monitoring to catch new openings early, then repair them before insects or rodents enter.
When Should You Replace an Aging Water Heater Instead of Repairing It?
Replace your aging water heater when repairs become frequent, leaks appear, or efficiency drops; although fixing costs less today, Water heater replacement saves money tomorrow. With aging appliance care, you’ll gain reliability, safety, and efficiency.
What Maintenance Helps Extend the Lifespan of Major Household Appliances?
You’ll extend appliance life through regular Appliance cleaning, timely Filter replacement, descaling water-using machines, inspecting seals and hoses, leveling equipment, avoiding overloads, and scheduling professional servicing when manufacturers recommend it.
About the Author


